My New Crested Gecko Build (ty Zen Habitats & Josh’s Frogs)
I recently finished my new crested gecko build for my crested gecko, Smeagol, and I am so excited to share it with everyone. This build was a collaboration with Zen Habitats and Josh’s Frogs, two of my very favorite companies in the reptile world, so it has truly been an amazing experience working with them on this.
That being said, the enclosure you are about to see was fully in collaboration with those two wonderful brands and I will have affiliate links associated with the build! It is completely up to you whether or not you’d like to use these links, but if you do, a portion of the sales do directly help to support my reptiles and I.
Two websites (JF & Zen respectively) were made specifically to showcase the products I used in this build and for ease of use for everyone to purchase products if you’d like to! ↓ ↓ ↓
Zen Habitats: https://www.zenhabitats.com/collections/welcome-to-kams-creator-collection-for-crested-geckos
Josh’s Frogs: https://joshsfrogs.com/a/kams-reptiles
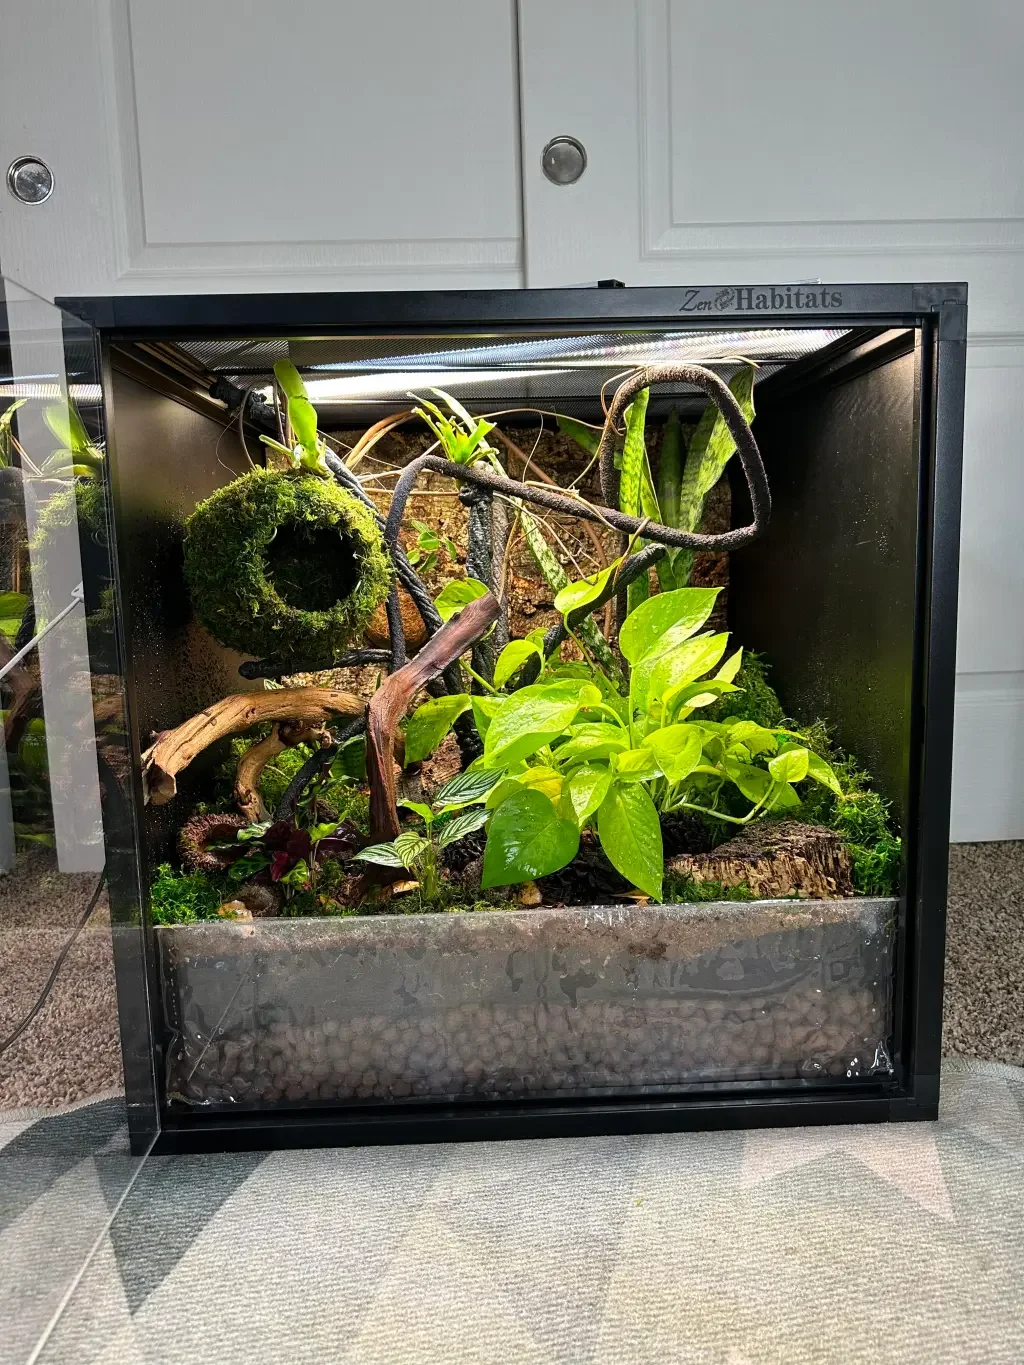
First off, the enclosure that I used in this video and for the build was the Zen Habitats Meridian 2x2x2 in the Black color! This is my first time buying one of the black enclosures and I absolutely love how sleek it looks. Especially for a species that is more active during the night time, I feel like the dark interior makes a lot more sense. As I have said before as well, the building process on the Meridian enclosures is so incredibly fast. I meant to record the time it took to build the enclosure, but my terrible memory failed me that day. I do want to say it only took 12 minutes or so, which is a huge upgrade from the regular enclosures. Big, big fan.
The next step was the Bio Basin from Zen Habitats, which I thought was going to be not completely necessary, but I realized later on that it is incredibly helpful in a bioactive enclosure. As someone who moves a lot (due to the military), I do frequently have to take apart bioactives, so this will make things 20x easier when that day comes along again. Also, completely separated from that fact, this helps your enclosures last exponentially longer due to the enclosures not being water-tight without the Bio Basin. I will definitely be using these in future builds; it was a very easy addition to the setup process.
I used Josh’s Frogs False Bottom as the drainage layer and the Josh’s Frogs Substrate Barrier as the necessities in the bottom half of the enclosure. Normally, I do cut my own barriers out of window screen, as a lot of you may know, but I actually preferred the ease of the pre-packaged substrate barriers. I got two of the packages and just overlayed them so it would fit the size of the enclosure, and that took much less time than my normal process. I think it looks nice and leaves out mistakes in cutting the wrong measurements (which I do every single time without fail). I used four bags of the false bottom as well, but I feel like you could have easily gotten away with just three. It’s a good drainage layer, honestly, nothing else much to say there!
I also used the Josh’s Frogs BioBedding as the substrate in this enclosure, and I honestly could not be happier with how it has been working for the last couple of months. The plants are doing amazing, it stays humid in the enclosure without being too humid, and the isopods and springtails seem to be thriving in it. I usually have quite a lot of issues with humidity in my tropical reptile enclosures, but this one has not been an issue since I finished it a while back. I do highly recommend if you have one of the species that this substrate works best for!
This is my first time using a premade enclosure background as well! I used the Josh’s Frogs Natural Virgin Cork Sheets and I think they look gorgeous in the enclosure. I did buy four of these and had to box cut a couple inches off the sides (as mentioned in the video as well) to allow it to fit snug, but overall it was really easy and looks beautiful. Cork is a perfect choice for a background like this because it holds up really well in high humidity environments. They even undergo a sterilizing process before shipping to you, just to make sure that there are no hitchhiking bugs coming to you.
For the little crawly dudes, I used Porcellionides pruinosus, or Orange Cream isopods (at the time of writing this, they are sold out. But they have SO many other amazing species to choose from) as well as the Temperate Springtail Cultures in 8oz. You can use either temperate or tropical in an enclosure like this, they are fairly similar species from what I know. Ideally, temps that crested geckos thrive in (65-82 degrees F) will allow the springtails to thrive as well. Also, for them to hide in and munch on, I got the Magnolia Leaf Litter, Magnolia Pods, and White Oak Acorn Caps! These were partially for that reason, and also because they look really nice and naturalistic in the enclosure. They kind of help to add some more life!
Some of the other features that I added include some various pieces of wood, a flexible hanging vine that wraps around the top of the enclosure, a beautiful woven moss cave, a really interesting jungle tree, and a jungle vine. These are aspects that kind of bring the entire environment together, and in my opinion, make a huge difference in the build. I have used the jungle vine before in my crested gecko’s previous enclosure and it lasted for almost three years while still looking relatively new. I will continue to repurchase that product for that reason! The moss cave as well was something I was very excited to add into this build because of the bright green color that matched the moss I ended up adding near the end.

Plants were also one of my favorite things that were a part of this build. I had a couple of different plants from the 18x18x24 Crested Gecko Vivarium Kit, as well as a Neon Pothos, and Rattlesnake Plant. This video was finished a couple of months ago as well, and the plants still look amazing. Even better than they did when I put them in right away, actually! I’m including a photo here of what the environment is looking like these days, and I absolutely love how everything turned out. I am excited for the Pothos to grow out a little more and start vining around the enclosure, mostly to help fill out the enclosure a bit more. But overall I think the enclosure looks great and my crested gecko really seems to love his new environment. Changing things up is a huge part of enrichment for these guys, and I could tell immediately that he was loving getting to explore a newly oriented enclosure.
Again, I am incredibly grateful that I had the chance to collaborate with Josh’s Frogs and Zen Habitats on this. They are two truly amazing brands that I always seek out for amazing products, whether it be for enclosures, accessories, live plants, or even live animals. These two brands truly care about the species that they create products for and it shows.
Also a big thank you to my followers for giving me a platform allowing me to do exciting things like this. It means the world. Don’t forget to check out the shoppable websites if you would like to snag anything that I used in this enclosure, and until next time, thank you so much for being here.